
Hello, and welcome to my little spot of the blogosphere for Novembers link up of Ho, Ho, Ho And on We Sew.
 I love, love, love Christmas, so back in January when I was asked by Fiona about hosting a month of this brilliant idea, I was so excited to have the chance to get organised and actually tick things off my list, nice and early, then I could enjoy December but……….things went a little crazy and every month I saw that you clever peeps kept linking up brilliant finishes, but I never got anything done to join in!
So, with my month approaching I decided to tackle something that I have had on my 'to make list' for at least 2 Christmases. Although it isn't a present, it's to get me tidy and organised over the super crazy Christmas Period and I think any wrapping enthusiast would probably like one as a gift.
The Christmas Gift Wrap Sack

You will need:
2 m of canvas fabric for the sack
1 fq & 1f8th of contrasting fabrics for the pockets
Bias binding
1.5 m of cord
ribbon and stamps for labels (optional)
 Cut your canvas fabric into two rectangles 18"x 36.5"
cut the contrasting fabrics into one rectangle of 13"x 18" and another of 9"x 18"
On the sack panels, mark 2" down from each of the top corners, once ¼" in from the side and another ½" in from the side.
You will then make a cut into the side of the sack panel to the ¼" mark. This is so that we can make the channel for the cord to go through.
 Fold the fabric above the cut inwards, press and topstitch. You should do this on each of the TOP two corners of both the sack panels.
 Then press the top of the sack panel ¼" down and then fold again and press so that it meets the 2" mark.
 Topstitch this down, you now have the cord channel.
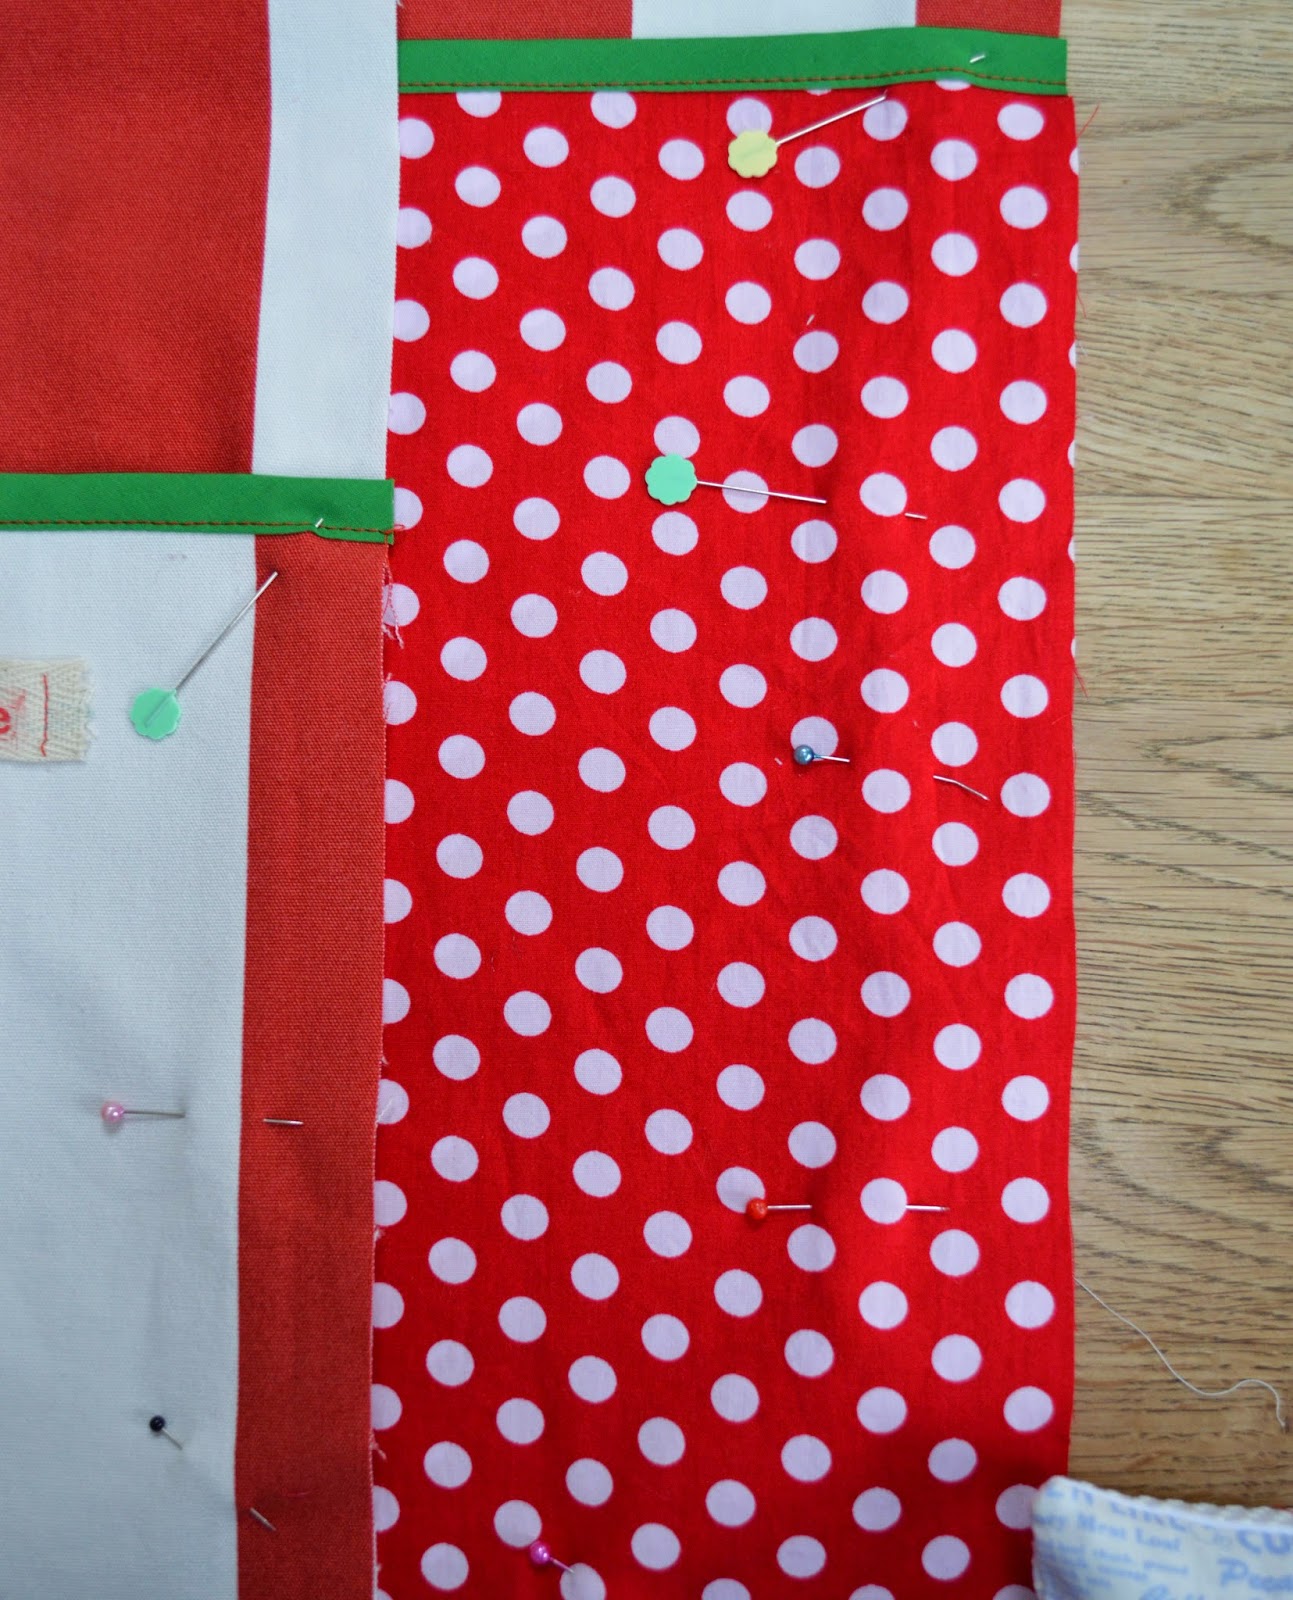
 Using bias binding cover the raw edge of the top of the pocket panels, topstitch into place.
 On the pocket fabrics mark out the size of pockets you would like ( I made the centre pocket 5" wide) and stitch any tags in place. Put the pocket panels on top of the sack panels and topstitch the pocket markings.
 Pin or topstitch the pocket panels onto the sack panels.
 Put the sack panels right sides together and pin together.
Starting UNDER the cord channel and using a ½" seam, sew the sack panels together, down the side, bottom and up the other side. STOP just before you reach the cord channel on the other side, backstitch at the beginning and end of your stitching to reinforce.
 Trim seams, clip the corners and turn right way around.
Attach a safety or basting pin to the end of the cord (I had to use masking tape as my cord kept fraying) and thread it through the cord channel.
 Fill it with gift wrap rolls, tags, tape and scissors and put it to use!
 And I have to say it is a massive improvement on my previous storage.
 The sack finishes at 17"x34" which means you can fit and close the sack with the rolls in, although you could shorten it if you don't mind them poking out! I like that I can hide the paper and it won't spoil my Father Christmas helping paper.
I hope this is clear, although feel free to holler if it doesn't make sense!
So, now the time for you to link up all of your Holiday makes, Fiona is offering these lovely Christmas fq's and I will be sending the winner a Christmas fq or two as well!

And it is really important for us to say a massive THANK YOU to our brilliant sponsors, without them it would be a prize-less and sad link up!!!
So, with my month approaching I decided to tackle something that I have had on my 'to make list' for at least 2 Christmases. Although it isn't a present, it's to get me tidy and organised over the super crazy Christmas Period and I think any wrapping enthusiast would probably like one as a gift.
The Christmas Gift Wrap Sack
You will need:
2 m of canvas fabric for the sack
1 fq & 1f8th of contrasting fabrics for the pockets
Bias binding
1.5 m of cord
ribbon and stamps for labels (optional)
cut the contrasting fabrics into one rectangle of 13"x 18" and another of 9"x 18"
On the sack panels, mark 2" down from each of the top corners, once ¼" in from the side and another ½" in from the side.
You will then make a cut into the side of the sack panel to the ¼" mark. This is so that we can make the channel for the cord to go through.
Starting UNDER the cord channel and using a ½" seam, sew the sack panels together, down the side, bottom and up the other side. STOP just before you reach the cord channel on the other side, backstitch at the beginning and end of your stitching to reinforce.
Attach a safety or basting pin to the end of the cord (I had to use masking tape as my cord kept fraying) and thread it through the cord channel.
I hope this is clear, although feel free to holler if it doesn't make sense!
So, now the time for you to link up all of your Holiday makes, Fiona is offering these lovely Christmas fq's and I will be sending the winner a Christmas fq or two as well!
And it is really important for us to say a massive THANK YOU to our brilliant sponsors, without them it would be a prize-less and sad link up!!!
   |
Hopefully we're all busy working away in our little Santa's Elf gift shops (aka our sewing rooms, or in my case, my sewing dungeon :D) so there should be lots of fun gifts posted this month - we're in the home stretch! Your gift wrap sack is quite adorable (and a heck of a lot prettier than a Gap bag, LOLOL) - and totally useful - win/win :) I try to use a lot of reusable bags for gifting, but I don't do that on gifts that have to be mailed because the bag can bump the package up to the next price level, and shipping is expensive enough already :D
ReplyDeleteThis is so much nicer than the usual plastic bag Joanne, great tutorial too!
ReplyDeleteThanks for hosting this month's Ho Ho Ho and on We Sew Link Party.
what an excellent idea!
ReplyDeleteWhat a fabulous idea! And many thanks for taking the time to write up the tutorial. : )
ReplyDeleteThanks for hosting the link up!!! your gift wrap sack is wonderful and a definite improvement over last years model!! Fabric wins over plastic every time and hand made is always the best!!
ReplyDeleteWhat a great idea, and so beautifully executed. It looks gorgeous. I'm on a mission to be organised this Christmas (if I pull it off it will be the first time ever!) so I have been busy with lots of Christmas making I've just added to your Link Up.
ReplyDeleteWhat a fabulous idea to keep everything contained and in the one place!!! Hope you don't mind but I'm pinning. Definitely running out of time for this year.
ReplyDeleteHi, Joanne - I'm popping in to thank you for the fabric you donated as a prize for November - I was the lucky winner, and I got the fabrics in the mail recently :) The green and natural prints work well with the red and green prints from Fiona - I should be able to get two "Two in One" zipper pouches (that's a pattern I recently bought, and conquered today when I finished my first one :D) from the prints - perfect to start my gift box for NEXT year, YAY :) I hope you're ready (or almost ready) for Christmas, and that your tree has more than 2 candy canes and a bauble on it ... HAHAHA! Sorry, couldn't resist :D
ReplyDelete